Install mcptask_runner, the AI developer
Pick your operating system, framework and coding CLI, and every command on this page becomes the one you actually type.
Free 30-day trial. No credit card. Cancel any time.
Not a Developer? Forward This Page to Your Team
Installation is done by whoever looks after your project and development machines. Forward this page to them; the business view without code is the one meant for you.
What you will pay
Two subscriptions, nothing else.
mcptask.online
Starter $19 a month for two users, Professional $14 per user a month. Humans and runners are users at the same price: every runner takes a seat of its own, so you and one runner are two seats.
Coding CLI
You pay its subscription directly to its provider – for Claude Code, at least Pro. Unattended runs use more than manual work.
30 days free, no card.
Full pricingPick your machine, your framework/platform and your coding CLI
Everything below is then written for exactly that combination — no branch left for you to resolve in your head.
Coding CLI
That pair does not exist, so the framework you picked stayed and the operating system switched to macOS.
What You Need Before You Start
Three things — and you almost certainly already have them. The cards and the checks below follow the coding CLI you picked above; the checks also name all three hosts the runner opens pull requests on: GitHub, Bitbucket Cloud and GitLab.
Project
Your project has to be a git repository with its origin on GitHub, Bitbucket Cloud or GitLab, and it has to be possible to commit and open pull requests from it on the machine the runner runs on. That means working access: an ssh key that can push, write permission on the repository, and the host's own credential for the pull request — the PR host check below shows the one yours takes. The runner works under your identity — what you cannot push, it cannot push either.
Claude Code
Set up Claude Code the way you would if you were about to use it yourself: installed, signed in, and on a plan that can carry a working day — at least Pro; a run left to work on its own gets through more than asking questions by hand does. Leave a CLAUDE.md in the repository — that is where the runner picks up the project context. The sign-in check is below.
Codex CLI
Set up Codex CLI the way you would if you were about to use it yourself: installed, signed in, and on a plan that can carry a working day; a run left to work on its own gets through more than asking questions by hand does. Leave a CLAUDE.md in the repository — that is where the runner picks up the project context, and init adds an AGENTS.md pointer to it so Codex CLI reads it too. The sign-in check is below.
OpenCode
Set up OpenCode the way you would if you were about to use it yourself: installed, with a model provider connected, and on a plan that can carry a working day; a run left to work on its own gets through more than asking questions by hand does. Leave a CLAUDE.md in the repository — that is where the runner picks up the project context. The provider check is below.
An mcptask.online Account
An account on mcptask.online with at least one project, plus a personal API token from the user menu. The token authenticates the runner as you, so it can read your tasks, write progress, and post messages on your behalf. No token, no runner — the install step asks for it because the installer needs it to wire up your .mcp.json.
Now Check, Don't Assume
The cards above explain; this block checks. Run each command and compare what prints with the expected answer — if yours differs, fix that before you touch the installer.
git, and an origin on GitHub, Bitbucket Cloud or GitLab
The runner opens pull requests, so your project must be a git repository whose origin points at GitHub, Bitbucket Cloud or GitLab — gitlab.com and self-managed instances both count. GitHub Enterprise is the host refused by name: it is matched by its exact hostname and rejected with a message that says so, never quietly treated as github.com.
git remote get-url origingit@bitbucket.org:workspace/your-app.git and git@gitlab.com:group/your-app.git are equally good answers. An SSH alias, a mirror or a self-managed GitLab that hides the host is what init --git-host bitbucket or init --git-host gitlab is for.
Homebrew macOS only
The macOS install channel comes from Homebrew — on Linux or Windows there is nothing to check here and you can move on.
brew --versionThe version does not matter — the check is that a version prints at all.
No extra package manager Linux & Windows
Linux and Windows install straight from a built-in toolchain — there is nothing extra to install or check here, move on to the installer below.
Claude Code — installed and signed in
Every other prerequisite on this page fails loudly and immediately. This one fails politely, hours later, somewhere nobody is looking: a machine with Claude Code installed but not signed in looks completely healthy. At 08:00 the scheduled job starts, the child cannot authenticate, and the day ends with nothing done — the only trace is a log you do not yet know exists. It is the single most expensive omission available on this page, so it gets the most space. Give the sign-in as much attention as the install.
Install it
curl -fsSL https://claude.ai/install.sh | bashmacOS and Linux — on Windows use the native installer: irm https://claude.ai/install.ps1 | iex.
Sign in
claudeThe first run opens the sign-in in your browser. Finish it — only the next step proves it happened.
Prove the sign-in
claude -p "Reply with exactly one word: pong"Anything but pong — above all a login error — means the sign-in, not the installer, is the next thing to fix.
Codex CLI — installed and signed in
The same polite failure waits in every coding CLI: installed but not signed in looks healthy until the scheduled job starts. Codex CLI is the one where the runner checks for you — its preflight runs codex login status before every run and refuses to start rather than spend quota on a CLI that fails on its first call. Run the same command now, so that refusal never happens at 08:00 with nobody watching.
Install it
npm install -g @openai/codexNeeds Node.js; on macOS, brew install --cask codex does the same.
Sign in
codex loginOpens the sign-in in your browser. Finish it — only the next step proves it happened.
Prove the sign-in
codex login statusThe exact command the runner's preflight runs. Logged in using an API key is an equally good answer; Not logged in means the sign-in is the next thing to fix.
OpenCode — installed, with a provider connected
OpenCode talks to whichever model provider you connect, and the runner names its models as provider/model — so the install is only half of it. A machine with OpenCode installed and no provider connected looks just as healthy as an unsigned Claude Code, and fails the same polite way: hours later, at the first scheduled run. Connect the provider now.
Install it
curl -fsSL https://opencode.ai/install | bashmacOS and Linux — on Windows use npm install -g opencode-ai.
Prove the install
opencode --versionThe version does not matter — the check is that a version prints at all.
Connect a provider
opencode auth loginPick the provider whose models you will name in the runner's config as provider/model. OpenCode has no read-only flag and needs none here: the runner injects a permission map instead.
The PR host — signed in where the pull request opens
Pushing a branch needs nothing but git. Opening the pull request is a separate call to the host, made by mcptask_runner pr — the one command the runner opens, checks and merges pull requests with — and each host takes its own credential. Check the one your origin names.
GitHub
Prove gh is signed in
gh auth statusOn GitHub, mcptask_runner pr goes through gh and its own login — an ssh key pushes the branch but cannot open the pull request. Not logged in means gh auth login is the next thing to run.
Bitbucket Cloud
Put the credential in the environment before init
export BITBUCKET_ACCESS_TOKEN=<your-access-token>An access token (Bearer) for a machine. For a person, BITBUCKET_EMAIL plus BITBUCKET_API_TOKEN (Basic) instead — never both. App passwords are refused: Atlassian ended them on 2026-06-09. In PowerShell: $env:BITBUCKET_ACCESS_TOKEN = "<your-access-token>".
What init does with it
ls -l ~/.mcptask_env.d/bitbucket_credentialsinit writes the credential to this file at mode 0600 — it never overwrites it with nothing and never prints it. On Windows the permission check is skipped.
GitLab
Prove glab is signed in
glab auth statusOn GitLab, mcptask_runner pr goes through the glab CLI, which holds its own login — the runner stores no GitLab credential of its own. Not signed in means glab auth login is the next thing to run. What pr create opens there is a merge request.
Self-managed: say so once
mcptask_runner init --git-host gitlabA self-managed instance needs this because its origin URL is not gitlab.com. The runner never takes a GitLab URL — glab already knows the instance it is logged in to.
- The coding CLI is named once per machine per project: mcptask_runner init --cli claude, codex or opencode. There is no default — a project that never named one is refused by name, not quietly assumed to be Claude Code.
- launcher.command only overrides the argv of the CLI you named; it cannot swap in a different one.
Then the Framework's Own Toolchain
The checks above are the same for every project. These are not — pick a framework above and only its block stays on the page.
Ruby on Rails
Four answers about the machine, and one command that has to finish clean. The runner's first act on a Rails project is to call the project's own binstubs, and those only work once the gems are already installed.
ruby --versionThe version the project's .ruby-version names, not whichever Ruby the operating system ships — a mismatch here is the first thing bundle install complains about.
bundle --versionBundler ships with Ruby, so this normally answers as soon as the line above does.
bin/rails --versionThe project's binstub rather than a global rails: it is the version the project actually boots with.
bundle installThis has to finish clean before the runner ever starts. A native extension that fails to build here fails again in every unattended run — at 03:00, with nobody watching.
bin/rails assets:precompile RAILS_ENV=testThe runner will not add this line for you: it is framework-neutral and sends no Rails-specific command in its prompt. If your system tests need compiled CSS, put this step in your project's CLAUDE.md or bin/ci, otherwise the tests will fail.
bin/ci is a convention, not a requirement. A project that has one gets it run; a project without one has that step skipped. Rails projects usually do have one, so this is the framework where the runner finds it most often.
Ruby on Rails is the one framework that changes the install channel — the wrapper gem instead of Homebrew, curl or scoop. That belongs to the next screen; there is nothing to do about it here.
Django (Python)
Python 3, a virtualenv that is actually active, and django-admin answering from inside it. The middle one is where this goes wrong: an install into the system Python looks like it worked, and then is not there when the runner calls.
python3 --versionBy the python3 name — on a machine where python still points at 2.x, that is the only name that answers reliably.
source .venv/bin/activate && which pythonThe path has to lead inside the project. If it says /usr/bin/python, the virtualenv is not active and everything installed below lands in the system Python instead.
django-admin --versionRun it with the virtualenv active. A version printed by a global install is not the one the project runs.
bin/ci is a convention, not a requirement. Django projects usually do not have one, and that is fine — the runner skips the step rather than failing on it. There is no file here you were supposed to write.
Laravel (PHP)
PHP, Composer and artisan. All three answer in a second, and the third one also proves you are standing in the project root — artisan is a file in the project, not a command on the PATH.
php --versionThe version the project's composer.json asks for — Laravel 11 wants 8.2 or newer.
composer --versionComposer installs the project's dependencies the way bundler does for Ruby, so the runner needs it before it can run anything at all.
php artisan --versionRun from the project root. Nothing printing here usually means the wrong directory rather than a missing Laravel.
bin/ci is a convention, not a requirement. Laravel projects usually do not have one and the runner simply skips that step — you are not missing a file you were supposed to write.
Node.js
The runner drives the project's own npm scripts, so two things have to answer before it can: Node itself, and the package manager the lockfile names.
node --versionAny recent LTS — the check is that a version prints at all.
ls package-lock.json pnpm-lock.yaml yarn.lock 2>/dev/nullThe lockfile that prints names the package manager the project uses: package-lock.json is npm (it ships with Node), pnpm-lock.yaml is pnpm, yarn.lock is yarn. Install that one and not the others — guessing wrong here is a confusing first error.
A Node.js project gets a second install channel on the next screen: npx @mcptask/cli init — the npm wrapper. The OS channel above still works; the choice between them belongs to the next screen.
React
React runs on Node, so the toolchain is the same one a plain Node.js project checks for — same Node, same package manager, nothing extra to install. The one honest difference is the entry point the project itself declares for develop and test.
node --versionAny recent LTS — the check is that a version prints at all.
ls package-lock.json pnpm-lock.yaml yarn.lock 2>/dev/nullSame as Node.js — the lockfile that prints names the package manager to install.
node -p "Object.keys(require('./package.json').scripts)"These are the commands the runner will eventually call — the dev server and the test entry come from this list, so dev and test have to be in it.
A React project gets the same npm channel on the next screen as a Node.js one: npx @mcptask/cli init.
Java
A JDK, and whichever build tool the project carries — Gradle or Maven is decided by the project, not by you, and the wrong one fails on the first run.
java -versionThe version prints to stderr, so it shows up either way — the check is that a JDK answered at all.
ls build.gradle build.gradle.kts pom.xml 2>/dev/nullThe file that prints names the build tool: a Gradle file means Gradle, pom.xml means Maven.
./gradlew --versionUse the project's wrapper, not a system-wide install — every Gradle project carries it and it pins the version the project builds with. A Maven project says ./mvnw --version instead.
Android
Android is a Java project plus a build toolchain: the JDK, then Gradle, then the Android SDK — and if the project's tests are instrumentation tests, a device or emulator has to be reachable too.
java -versionGradle runs on the JDK, so this answer gates everything below it.
./gradlew --versionEvery Android build goes through Gradle — unlike a plain Java project, there is no Maven variant to detect.
adb --versionadb ships with the SDK's platform-tools, so a version printing proves the SDK is installed.
adb devicesOne listed emulator or device is enough — it only matters when the project runs instrumentation tests, and nothing else on this page will notice it missing.
The runner drives whatever CLI the project builds and tests with, so a project whose tests need a device or an emulator has to have one available when the run happens — the scheduled run at 03:00 included.
Swift / Xcode macOS only
Xcode itself, its command line tools, and xcodebuild — all three exist on macOS only, which is why the picker never offered this framework anywhere else.
xcode-select -pThe path the command line tools live at — /Library/Developer/CommandLineTools is an equally good answer while Xcode itself is not installed yet, but then the next step has to be.
xcodebuild -versionOne answer for both Xcode and its xcodebuild driver — and the version has to be the one the project builds with, not the newest the App Store offers.
xcrun simctl list devices available | grep -c iPhoneAny number above zero is enough — it only matters when the project's tests boot a simulator.
The runner drives whatever CLI the project builds and tests with — xcodebuild here — so a project whose tests run on a simulator needs one available when the run happens, not just at install time.
No framework
Nothing beyond the checks above. That is the whole answer and not a block that failed to load: a project built with a Makefile, a shell script or nothing at all has no framework toolchain to check, so git with a GitHub, Bitbucket Cloud or GitLab origin and a signed-in coding CLI is the entire list.
bin/ci is a convention, not a requirement. If the project has one, the runner runs it; if it does not, that step is skipped. Nothing to install, nothing to write — go on to the next screen.
Install the runner and run init
Two steps: A) the runner onto this machine, B) init, which writes everything else into the project — the token, the MCP entry (.mcp.json on Claude Code), the CLAUDE.md section, the skills and the scheduled run. Init asks for your API token; find it at mcptask.online → your name (top right) → Show → Enhanced information → API Token. You type none of it by hand; anyone the binary does not suit has the by-hand walk at the foot of the page.
Install the runner
One command, chosen by what you picked above. Six frameworks get their operating system's own package manager; Ruby on Rails gets a wrapper gem instead of it; Node.js and React get npm alongside it.
The binary is not yet signed or notarized by Apple, so Gatekeeper attaches the com.apple.quarantine attribute to it after download. The cask clears it; without that the first run would end with no output at all and look like a broken binary. You verify the download is genuine with a SHA-256 checksum against the release's checksums.txt, as described below.
The script reads four variables if you set them: MCPTASK_VERSION pins a release tag, MCPTASK_INSTALL_DIR moves the destination, MCPTASK_RELEASE_REPO points it at a fork, and GITHUB_TOKEN raises the anonymous rate limit. It never calls sudo.
The bucket only has to be added once; a second install on the same machine is the second command alone.
A Rails project does not install the runner from the operating system at all. The wrapper gem replaces that channel entirely — the binary arrives through the same Gemfile the rest of the project already goes through.
group :development do
  gem "mcptask-rails-runner"
end
Why through the Gemfile: the version is then pinned by the lockfile your team already reviews in a pull request, so the whole team moves to a new runner together and on purpose, instead of one machine at a time whenever somebody happens to run an upgrade. The gem comes from rubygems under its own name, mcptask-rails-runner — it is not the old github-sourced gem under a new version.
Node.js and React get one more channel, not a different one: npx is the natural way to reach a tool from a JS project, and the operating system's command above stays just as correct.
The package carries no binary. Its postinstall downloads the archive for your platform from the same mirror, verifies the SHA-256 against checksums.txt, and unpacks it into a local bin directory; the wrapper then forwards arguments and exit codes untouched, so it behaves like the binary itself. It is published by OIDC trusted publishing, so there is no long-lived npm token anywhere that could leak.
Whatever the channel: the same six release archives per tag — darwin/amd64, darwin/arm64, linux/amd64, linux/arm64, windows/amd64, windows/arm64 — and the same SHA-256 verification against the same checksums.txt before anything is unpacked. There is no separate "Windows trust chain" that is weaker or stronger than the others.
Run init, with the options you want
One command installs the runner into this project. Written out with its flags rather than bare, because the flags are what decide where auto-filed bugs go, which mode the scheduled job runs and when.
Omit any of them and init asks — it is an interactive installer first. What it will not do is guess: --cli has no default, so a project that never named its coding CLI is refused by name rather than assumed to be Claude Code; and a non-interactive install (a pipe, a provisioning script, no terminal on the other end) with no --mode named SKIPS scheduling altogether rather than picking a mode for you. --at defaults to 08:00. --until has no default at all: leave it out and there is no end of day, and the runner works until its quota is spent.
Seven more flags
- --git-host HOST
- Pins the PR host — github, bitbucket or gitlab — when the origin URL cannot say it: an SSH alias, a mirror, a self-managed GitLab. Left out, it is derived from git remote get-url origin. GitHub Enterprise is refused by name.
- --schedule
- Regenerate the scheduled job and nothing else — skills, permissions, token and the config sections are left exactly as they are.
- --force
- Overwrite what is already on this host: skills, config sections and the scheduled job.
- --helper-bin-dir PATH
- Where the CI and test helper scripts are written. Default ~/.claude/bin.
- --home-dir PATH
- Re-roots the token directory, the shell rc file and the scheduled job. Default is the user's own home.
- --verbose
- Dump every stream line instead of the filtered view. Lives on the root command, so it applies to every subcommand.
- --ignore-quota
- Skip every quota check. Also a root-command flag.
Three of them are what make this command usable from a provisioning script: --force so a re-run is not a question, --helper-bin-dir and --home-dir so a build agent can write somewhere other than a real user's home.
What init left on your disk
Not reassurance — an inventory, so you can find each of these later. Re-run init any time: every step is idempotent, and anything you edited by hand is kept.
Skills copied for your CLI — twelve on Claude Code, nine on Codex CLI and OpenCode
Claude Code gets twelve in .claude/skills/: ci-runner, ci-start, ci-wait, wait-unlock, test-runner, test-start, test-wait, discover, memory-search, mcptask-read, mcptask-write and pr. Codex CLI gets nine in .agents/skills/ and OpenCode nine in .claude/skills/ — the same list without discover, memory-search and mcptask-read, which fork a subagent only Claude Code can start. Each one gets an MD5 content hash in .mcptask_runner_manifest.json, so a later mcptask_runner update can tell a shipped file from one you edited.
One MCP entry added — nothing else touched
Only the mcptask-online server is added, against https://mcptask.online/mcp and reading your token variable — in .mcp.json on Claude Code, .codex/config.toml on Codex CLI, opencode.json on OpenCode. Every other MCP server in that file is left exactly as it was. On Claude Code the entry is "type": "http": a host already on it is never downgraded back to SSE, and a .mcp.json that does not parse is refused rather than replaced — --force moves it aside to .mcp.json.bak first.
Token exported under the name your MCP config declares
The token is stored under the variable name your project's own MCP config declares — not a hard-coded MCPTASK_TOKEN. On Unix it is written into ~/.mcptask_env.d/ and ~/.zshenv (in bash ~/.bash_profile and ~/.bashrc) is taught to source that directory; on Windows it is persisted with setx. A Bitbucket credential goes the same way, into ~/.mcptask_env.d/bitbucket_credentials at mode 0600 — never overwritten with nothing, never printed; on Windows that permission check is skipped. A token that already resolves is never asked for again.
Approvals set for your CLI, additively
On Claude Code the baseline permissions are merged into .claude/settings.local.json strictly additively: allow and deny become unions with what is already there, enableAllProjectMcpServers is only ever flipped on, and every other key in the file is left alone. Nothing you granted or refused by hand is dropped. Those Claude Code permissions apply to Claude Code only: Codex CLI works from the .codex/config.toml init wrote, and OpenCode from opencode.json, with the permission map the runner injects because OpenCode has no read-only flag.
Scheduled job generated, helpers and config written
The schedule is generated for whichever OS you are on — a launchd LaunchAgent, a systemd user timer, or Task Scheduler XML — to run ~/.mcptask/bin/mcptask_runner on weekdays at the time you picked, and the enable command is printed for you to run. Alongside it, nine helper scripts (ci_start, ci_wait, _ci_filter_tail, test_start, test_lock, check_test_lock, run_with_log, kill_tree and runner-log, the one that tails a running runner's log) land in ~/.claude/bin, and your bug destination and waiting strategy are written into config/mcptask_runner.yml.
The scheduled job is generated and NOT activated. init writes the LaunchAgent, the systemd user timer or the Task Scheduler XML, prints the one command that switches it on — and stops there. Nothing spends any quota until a human runs that command, two screens further down.
Look first, change nothing
once_dry is the only mode that skips triage entirely: it shows the next task and exits. No branch, no commit, no quota — it answers the only question you have right now: is the token right, and does the runner see your project?
An empty queue is a perfectly good result. You are testing the connection, not asking for work — assigning something comes later, when it actually matters.
Then one task, picked by you
Still a no-stakes experiment. --task-id addresses one specific piece directly instead of going through the queue, so it does not matter who the task is assigned to — point the runner at any of them; in practice, make a throwaway task and watch what happens.
--task-id is required for task_manual and task_auto_squash — the mode is refused without it.
On the command line task, story and queue work too: they are aliases for task_manual, story_manual and queue_manual, so nobody has to guess which spelling is right.
What "done" looks like: a branch, commits and a pull request left open for review — opened by mcptask_runner pr on whichever host the origin names — GitHub, Bitbucket Cloud or GitLab. task_manual is a manual mode — nothing is merged; the auto-squash variants are the ones that merge after CI goes green. The full mode table lives on the Runner page: Loop + goal
This is the first command on this page that spends real quota. When the daily quota is already spent, --ignore-quota skips the check — accepting it means the runner works past the limit, knowingly, on your say-so.
Now for real: the job on a schedule
Enable the scheduled job, kick it off once by hand, and follow the log. This is the first screen where the runner works without you sitting there.
The <slug> is the project directory's basename with underscores turned into hyphens — it shows up in the plist label, the systemd unit names, the Windows task name, the wrapper script and the log filename, so the placeholder reads the same wherever it appears.
A worked example, because a placeholder alone is easy to mis-read: the project lives in ~/Projects/my_shop, so the basename is my_shop, the underscore becomes a hyphen, and the slug is my-shop. Read every line on this screen with my-shop wherever <slug> stands:
This example is informative only — you never assemble these lines by hand. mcptask_runner init ends by printing the finished commands for your own project, slug already filled in and colour-highlighted, ready to copy. The screens here are so you recognise what init printed and know how to switch the job off again.
A scheduled job never sources your shell profile. The token is read from the variable .mcp.json declares (MCPTASK_TOKEN by default) and baked into the job at install time. When nothing resolves, the literal string SET_MCPTASK_TOKEN_HERE is written and the runner refuses to start rather than running as nobody.
The Web UI, From Tomorrow On
Two things have to happen in the browser before the runner can pick its own work: turn on the runner display, and assign pieces to the user whose API token is in .mcp.json. The first makes the grid visible; the second makes the queue non-empty.
So far you have tried the runner from the terminal: a free look, one task by id, then a run nobody watches. None of that needed the web interface and nothing had to be assigned, because --task-id addresses a task directly. This is where you move from "let me see what it does" to "this is how I will use it".
Turn on the runner display
The runner grid is gated on a per-user home-page element. Without it the home page does not render the section at all, and the runner looks like it is not there even though it is connected and idle.
Open Users, then Edit on the user the runner authenticates as.
On the Dashboard elements card, under Show, tick "Runner sessions".
Save. The runner grid appears on the home page for that user — empty until something connects.
The grid is empty by design. Nothing renders inside it until a runner actually connects; "no card" on a fresh install is the expected state, not a broken one.
Assign work to the user the runner authenticates as
The queue only ever offers assigned work. An unassigned piece is invisible to @next — not deprioritised, invisible. From here on the runner picks its own work, and it can only pick what has been handed to it, so the piece's assignee has to be the user whose API token went into .mcp.json.
The user in question is the one whose token is in .mcp.json — not necessarily the reader, and on a shared machine very often not. Assigning to yourself while the runner holds a colleague's token produces a runner that sits there with nothing to do.
Assigned-only, not deprioritised
There is no "low priority for unassigned" lane. The queue is a flat list of pieces assigned to the runner's user; the rest do not appear in it. Assigning late is a fix, not a re-prioritisation.
Three things the runner will not pick up
Each one looks like a broken install on first contact, because the piece exists, it is open, and nothing happens. The common thread: the runner recognises the piece but treats it as not-yet-ready. The queue is doing what it was told.
Piece type: ideaIdeas are never offered. The runner queue is tasks, stories and recurents only — an idea has to be promoted to a task before a runner can pick it up.
Story with no subtasksA story that has no tasks under it is never offered. Open the story, add at least one task, and the runner can see it. A story with a single subtask is a story with a ticket; that is the smallest unit the queue will dispatch.
Assigning a StoryAssigning a story to the runner's user gates the queue: its subtasks leave the general queue and the runner walks that story instead. Useful on purpose (one story, one PR, one squash), surprising if you expected it to behave like a task. Assign the task, not the story, when you want the queue to keep flowing.
Feed it something worth doing
The runner is only as good as the piece it is given. A first unattended run against vague tickets — open-ended acceptance criteria, an undefined "done", a task whose title is the whole feature — teaches the wrong lesson about the product, because the runner did exactly what the ticket said, and what the ticket said was nothing useful. Write the next task the way you would brief a new hire on day one.
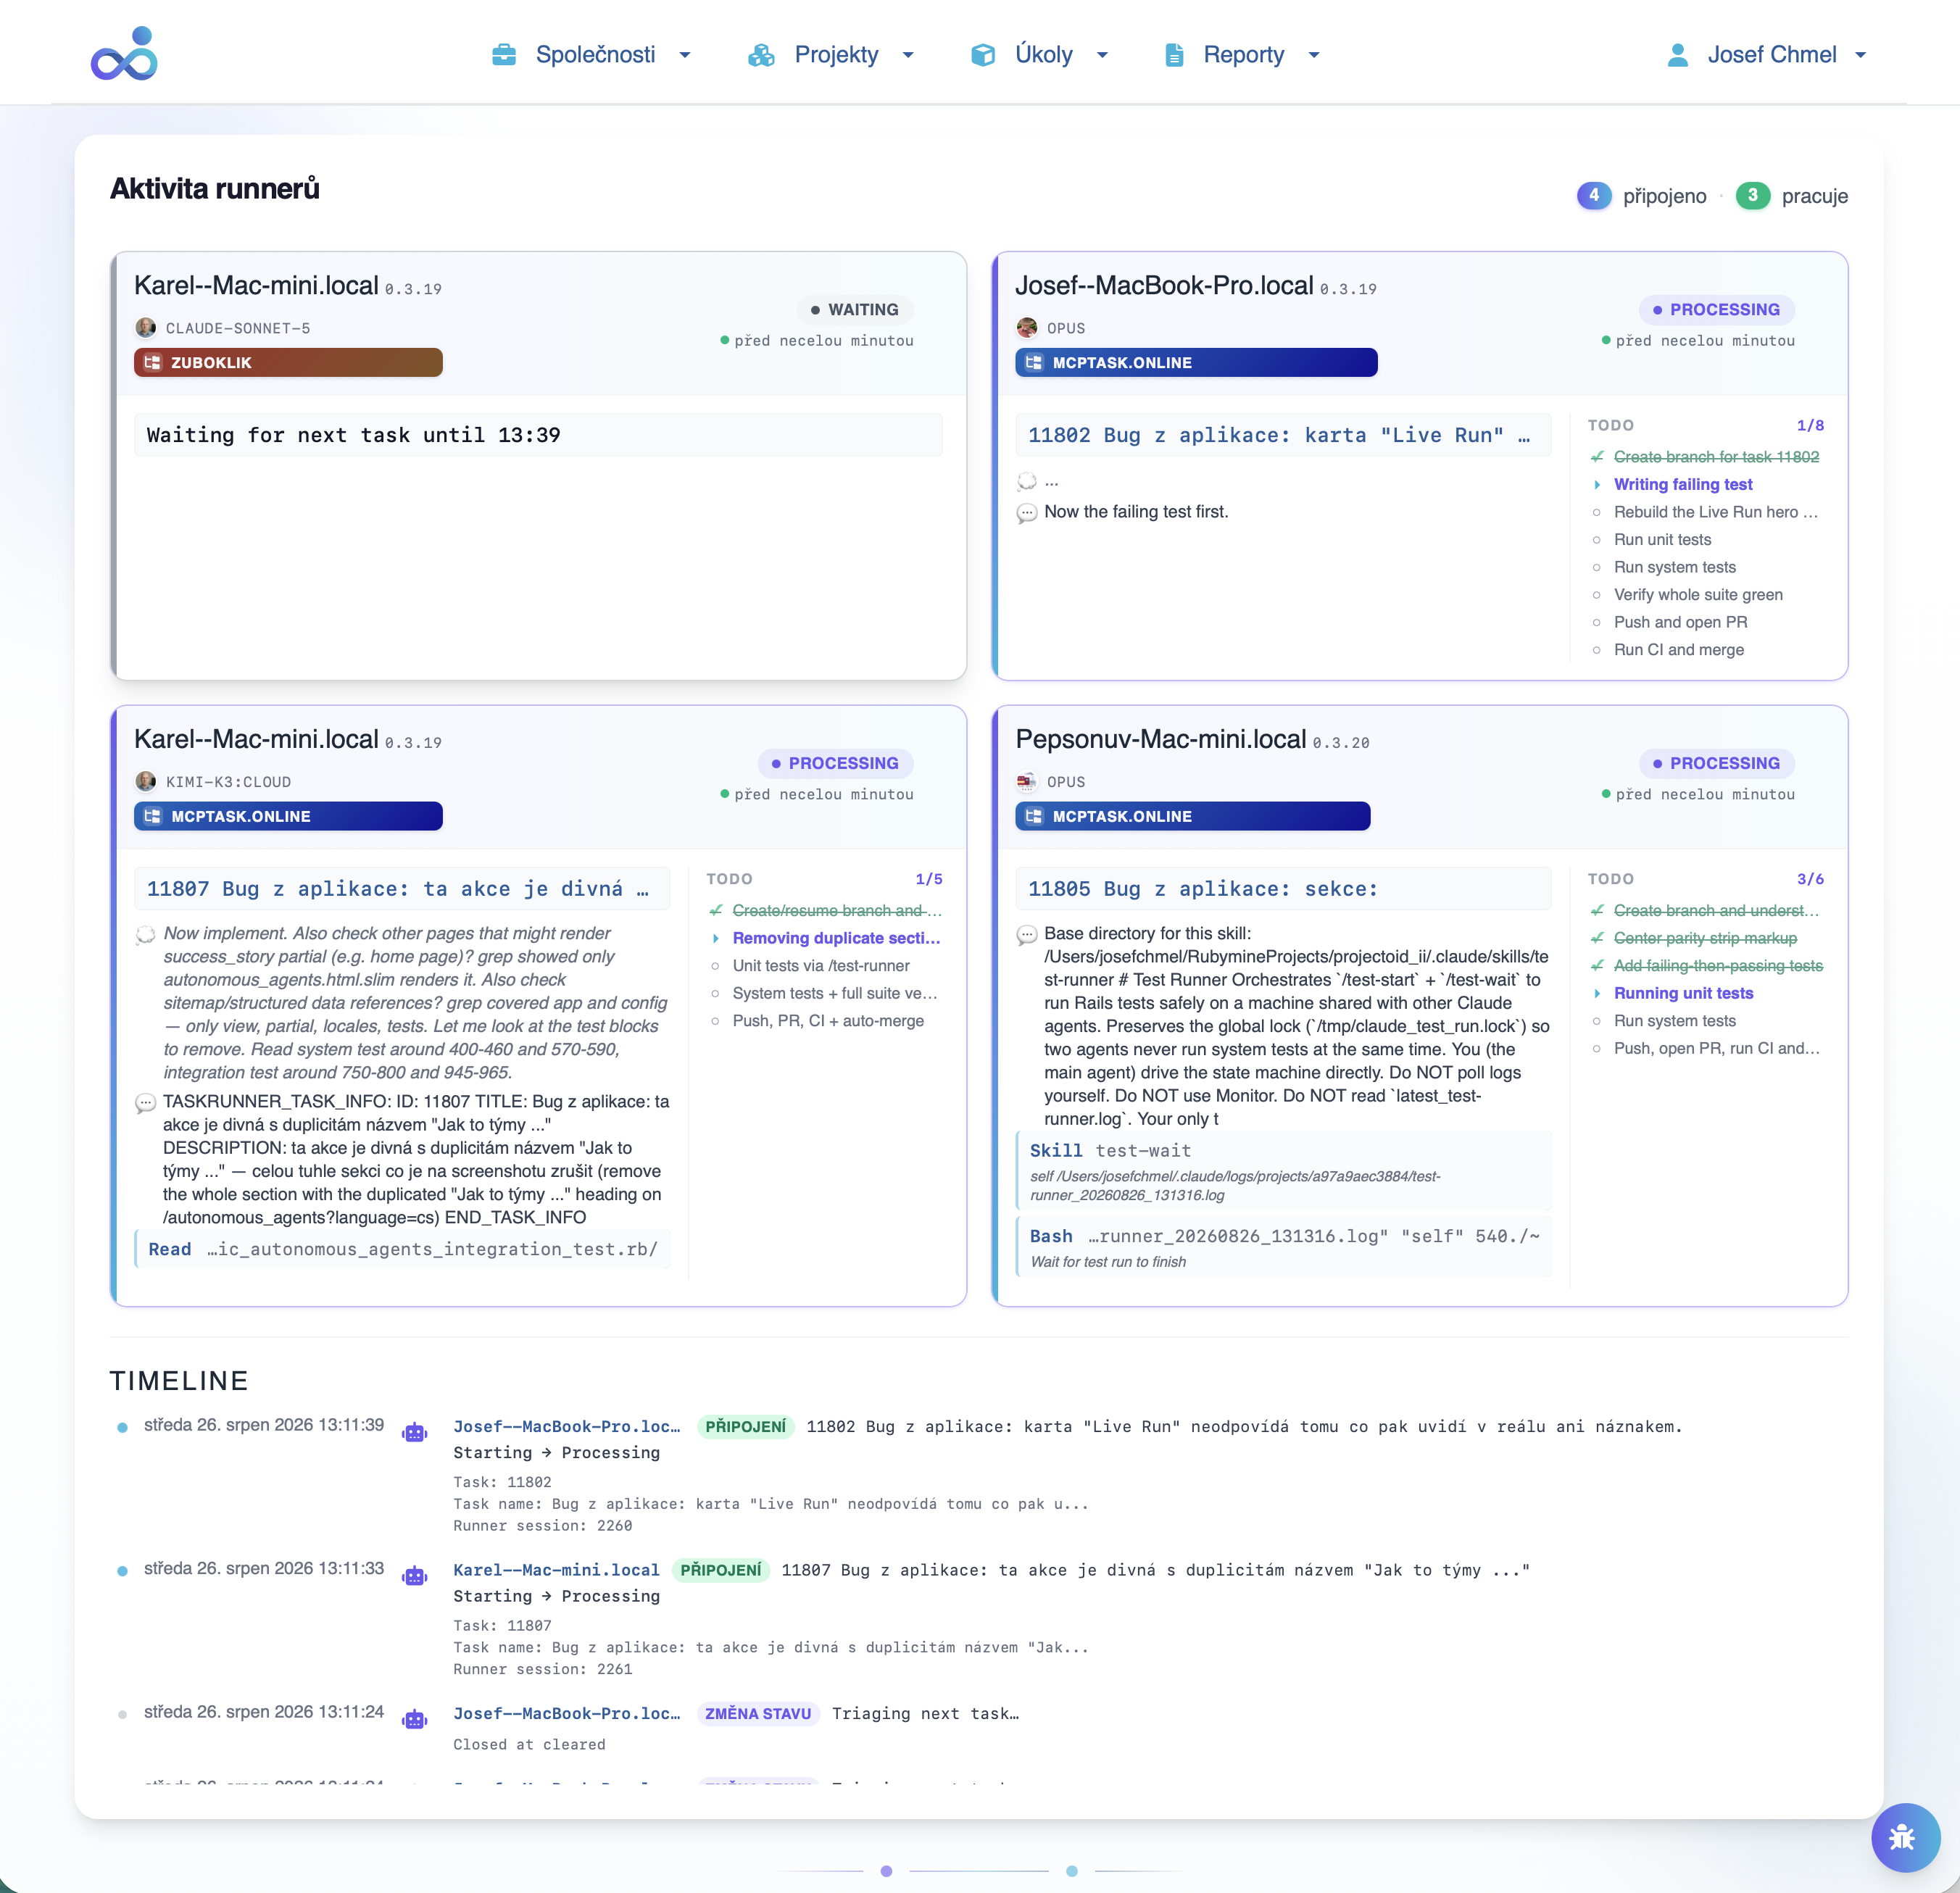
Watch It Work: The Live Runner Card
The one screen on this page that is a picture, because seeing the card move is the whole point. Everything above was you typing; this is the runner answering back.
What to expect in time
The gap between starting the runner and seeing the card is where most people conclude something is broken. It is not — the card has a lifecycle of its own, and it looks like this:
The card appears within seconds of the runner starting. With the runner display on and the grid visible, nothing more is needed.
It moves through starting → triage → processing as the run progresses — the state machine in the open, not hidden behind a spinner.
When the loop ends, the finished card lingers for 60 seconds and then goes. A card that disappears is a runner that finished, not a grid that broke.
A runner started without a token says so — once, out loud, at startup. It does not silently fail to appear.
An empty grid means one of two things
Either the runner has not started — check the scheduler screen above — or it started but could not connect, which it would have said at startup. What it does not mean is that the install failed: a finished install has its grid on the home page whether or not anything is running.
Wire It Up By Hand — No Binary Involved
Any MCP-capable AI client can talk to mcptask.online directly. Four steps, all of them plain configuration: get a token, declare the server, point the agent at your project, verify.
Get your API token
Log in to mcptask.online, open your name (top right) → Show → Enhanced information → API Token. Copy the string exactly as it is shown — it is an opaque secret with no fixed prefix or length, so never retype it from memory. Treat it like a password: anyone holding it acts as you on mcptask.online.
mcptask.online → your name (top right) → Show → Enhanced information → API Tokenexport MCPTASK_TOKEN='<paste your API token here>'The variable name is yours to choose — nothing on our side fixes it. What matters is that the name you export here is the exact name your .mcp.json interpolates in step 2. If the two drift apart — you export MCPTASK_KAMR_TOKEN while the config still reads ${MCPTASK_TOKEN} — the client substitutes whatever that other variable happens to hold, or an empty string. In the first case the agent authenticates as a different user and the work lands on somebody else's dashboard; in the second it is simply rejected.
What just happened
Put the export line in your shell profile so every MCP client you start can see the token — and write it into a file a login shell reads too. A token exported only in ~/.zshrc or ~/.bashrc is there when you open a terminal and gone when launchd or a systemd user timer starts the same work; ~/.zprofile (on Linux ~/.bash_profile or ~/.profile) is the file that survives both. On Windows $env:MCPTASK_TOKEN lasts as long as the window — setx, or SetEnvironmentVariable with the User scope, is what writes it into the user environment a Task Scheduler run reads.
Declare the mcptask-online server in your MCP config
Open your client's MCP config file — .mcp.json in the project root for Claude Code, or Claude Desktop's developer settings — and add the entry below. The Authorization header interpolates the very same variable you exported in step 1, so rename both together or neither.
{
  "mcpServers": {
    "mcptask-online": {
      "type": "http",
      "url": "https://mcptask.online/mcp",
      "headers": {
        "Authorization": "Bearer ${MCPTASK_TOKEN}"
      }
    }
  }
}
Write new configs as "type": "http" against https://mcptask.online/mcp. Older configs use "type": "sse" against https://mcptask.online/mcp/sse — the server still accepts that spelling, so an existing SSE entry keeps working, but it is the legacy form. For Claude Desktop, paste the same entry into its own MCP config file, claude_desktop_config.json — open it from Claude Desktop's settings rather than from a path we print here, because both the file location and the wording of that settings screen differ by OS and by version.
Tell the agent which project to work on
Open your project's CLAUDE.md (or the equivalent context file your AI client reads) and add the section below. Without it the agent has no idea which project or account to read and write tasks for — this is the human-readable way it gets its bearings. The template below is the only one the page ships; keep the work-loop line in it, because that line is what keeps the agent in its loop, and one without it stops after a single task.
## mcptask.online
- Project name: <your project name>
- project_relative_id=<your project id>
- account_code: `<your account code>`

## Usage notes
- Access mcptask.online via the MCP server (key: `mcptask-online`).
- Everything is a **piece** — URIs never use `/tasks/` or `/stories/`.
- Always use `relative_id` in URLs / references, never the internal `id`.
- Read with: mcptask://pieces/{account_code}/{piece_id}
- Current user: mcptask://user (a literal URI — it takes no account code)
- Create pieces via the write tools; **content in English**.
- The work loop: load the most important task → work on it → check the daily quota → repeat.
What just happened
Read project_relative_id and account_code off the screen rather than guessing them from the project name: project_relative_id is the number in the URL when you open the project on mcptask.online, and account_code is the short code shown under the account name in the account switcher. Without those two values the runner refuses to start. Not a warning it prints and carries on past — it has no account to ask and no project to ask about, so it stops.
Verify the connection
Restart your AI client (or reload its MCP config). Ask the agent one plain-English question to confirm it can reach mcptask.online. If it returns a piece, you are connected. If it errors, jump to the FAQ below.
List the next open task from my mcptask.online project.mcptask://pieces/{account_code}/@next?project_relative_id={project_relative_id}&exclude_relative_ids={exclude_relative_ids}What just happened
That URI is the canonical read entry point. The project_relative_id query parameter belongs to it — the discovery URI is the whole string, not the part before the question mark. If the agent can fetch it and return one task, every other piece URI works too.
How to Confirm It Works
Three quick checks, in order. If all three pass, the connection is good. If any fails, the FAQ below has the most common cause for each.
The agent lists your projects
Ask the agent to list your projects. It should return at least one row with a project name and a project_relative_id. If it returns nothing, the token is wrong or the account_code is missing from CLAUDE.md.
What projects do I have on mcptask.online?The agent fetches the next open task
Ask for the next task. It should return one piece with a name, description, and difficulty (the scrum_point field). If you have no open tasks, it returns no piece but a short message saying there is nothing to work on — the exact wording comes from the server and may vary. That is still fine, the connection is working.
Fetch the next open task for me.The agent can read a specific task by URI
Give it an exact URI from the web UI (open any task, copy the relative_id from the URL). The agent should return that task's full details. This is the most reliable end-to-end check.
Read mcptask://pieces/{account_code}/{piece_id} and summarise it for me.Common Questions, Plain Answers
What is MCP, in plain language?
Think of MCP as a USB cable between your coding CLI and mcptask.online — the runner plugs Claude Code, Codex CLI or OpenCode into your task queue so the AI can read, work, and log tasks directly. The acronym itself is defined once in the glossary on the developer integrations page.
Does this work on Linux / Windows / a server?
Yes — the runner, .mcp.json and the bundled skills run on any desktop OS. Scheduling has three real back-ends, not a macOS-only one: a launchd LaunchAgent on macOS, a systemd user timer on Linux, and a Task Scheduler job on Windows. On any other platform init prints Scheduling: skipped (no generator for ...) rather than guessing, and the install finishes without a schedule. On a server where nobody is logged in, a systemd user timer does not run by itself, so on Linux init prints sudo loginctl enable-linger $USER, which lets it run without a login. The runner does not set up any other scheduler, such as cron. File paths and enable commands live in the unattended run screen above.
Is the runner safe to leave running unattended?
Yes, as long as you know what each mode is allowed to do. The runner runs on your machine with your development environment and development database, so it tests, takes screenshots, and pushes commits like a developer; it sees production data only if you give it access yourself. It merges only in the *_auto_squash modes, and only after the local tests and CI pass; a project without CI is merged after the local tests. The manual modes, such as queue_manual or task_manual, never merge and only open a PR for review. If the agent gets stuck, runs out of context, or is interrupted, the harness recovers and the task lands in a PR instead of being left half-done. If the runner hits a bug in code it was not asked to fix, it files its own tracked task for it and handles it in the same mode as your work.
Can I undo or remove the installation?
Yes, by hand — the runner has no uninstall command. This is everything init writes:
In the project, delete the skills — on Claude Code the twelve in .claude/skills/: ci-runner, ci-start, ci-wait, wait-unlock, test-runner, test-start, test-wait, discover, memory-search, mcptask-read, mcptask-write and pr; on Codex CLI (.agents/skills/) and OpenCode (.claude/skills/) the nine of them without discover, memory-search and mcptask-read. Then .mcptask_runner_manifest.json, .claude/test-commands.json, the mcptask-online entry in .mcp.json, .codex/config.toml or opencode.json, the runner permissions in .claude/settings.local.json, and config/mcptask_runner.yml together with its .gitignore line.
In your home directory, delete the helper scripts and the mcptask-runner-<slug> launcher in ~/.claude/bin, the ~/.mcptask_env.d/ directory, and the line that sources it from ~/.zshenv (for bash from ~/.bash_profile and ~/.bashrc; on Windows the variable set with setx).
The scheduled job: on macOS run launchctl bootout gui/$(id -u)/online.mcptask.runner-<slug> and delete ~/Library/LaunchAgents/online.mcptask.runner-<slug>.plist; on Linux run systemctl --user disable --now mcptask-runner-<slug>.timer and delete the .service and .timer in ~/.config/systemd/user/; on Windows run schtasks /Delete /TN mcptask-runner-<slug> and delete ~/.mcptask/mcptask-runner-<slug>.xml.
The binary leaves through the channel it came in on: by hand for the install script, brew uninstall jchsoft/tap/mcptask_runner for Homebrew, scoop uninstall mcptask_runner for Scoop; npx installs nothing globally; for the Rails wrapper gem remove the mcptask-rails-runner line from the Gemfile and delete ~/.mcptask/bin.
Get the Token, Then Run the Installer
Start a 30-day free trial and get your MCPTASK_TOKEN. Then run the installer and the runner picks up your most important task.
Free 30-day trial. No credit card. Cancel any time.